
If you can’t live without t-shirts this summer then we’ve got what you need to keep in style while staying comfortable. You can transform any old t-shirt into a new look with these 5 DIY ideas.
Pineapple Potato-Stamped Prints
Materials
T-Shirt
1 Utility Knife
1 Potato
1 Clothing Iron
Paper
Cloth
Plastic Sheet
Acrylic Paint (yellow, green)
Paint Brush
Instructions
- Cut the potato in half. Create cross hatch marks on the potato by carving out diagonal lines using the utility knife.
- Lay the t-shirt flat, put a sheet of plastic or paper inside the shirt to prevent the paint from staining the back of the shirt.
- Brush on the lemon yellow paint evenly on the carved potato, make it stand out more by applying some golden yellow and brown paint to create a shade.
- Test out the color consistency of the potato stamp on a sheet of paper, then stamp it on the t-shirt to create your desired pattern. Dip the brush in green paint and paint on the pineapple leaves above each stamp.
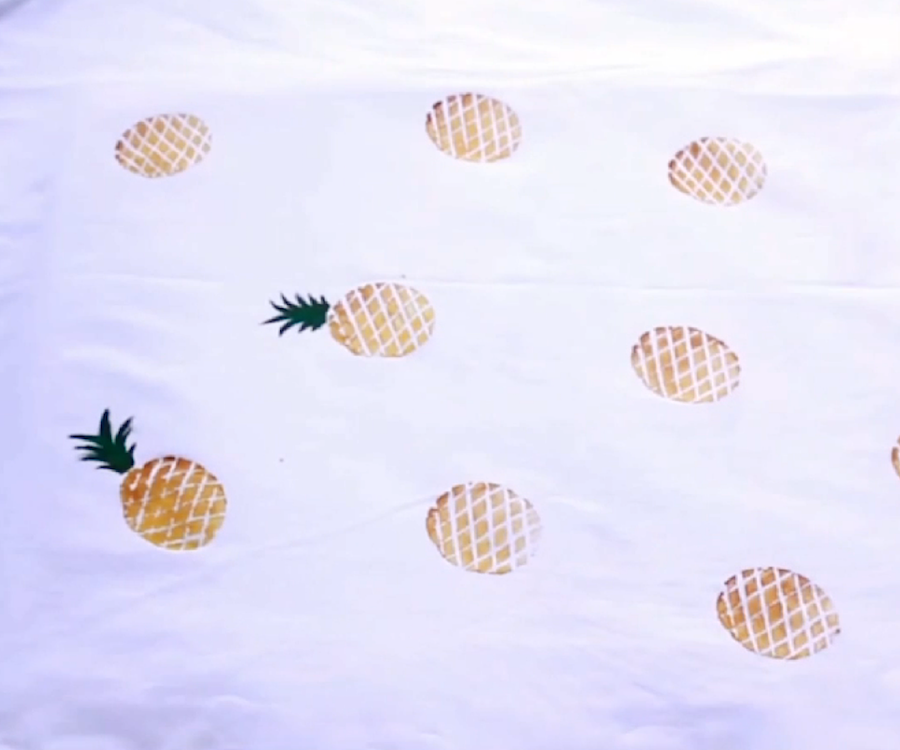
Dip the brush in green paint and paint on the pineapple leaves above each stamp - Allow the shirt to dry for 2-3 hours, cover the shirt with a thin cloth and iron it, this will help to make the acrylic paint more wash-proof.
Moustache Potato-Stamped Prints
Materials
T-Shirt
1 Utility Knife
Acrylic Paint (Black)
1 Potato
1 Clothing Iron
Paper
Cloth
Paint Brush
Instructions
- Print out an image of a mustache (or any image you like) then cut it out. Don’t have a printer? Just trace/draw it.
- Use the other half of the potato leftover from your pineapple potato print! Place the mustache cut-out on the middle of the potato, now use the utility knife to carve out the potato around the mustache to create your stamp.
- Use the brush to apply black paint on the mustache shape, test out your stamp on a sheet of paper, then stamp the shape all over the t-shirt to create your desired pattern of prints.
- Allow the shirt to dry for 2-3 hours, cover the shirt with a thin cloth and iron the shirt, this will help make the acrylic paint wash-proof.
Spray Paint Puzzle Shirt
Materials
T-Shirt
Puzzle Pieces
1 Acrylic Spray Paint
1 Washable Glue Stick
Paper
Instructions
- Lay the shirt flat, use the washable glue stick to attach the puzzle pieces on to the front of the shirt.
- Use paper to cover the sleeve and neckline area of the shirt. Spray the acrylic paint colors of your choice over the puzzle area, wait 10 to 20 minutes for the paint to dry and remove the puzzle pieces.
Galaxy Heart Shirt
Materials
T-Shirt
1 Needle
1 Ruler
1 Scissor
1 Sharpie
1 Paint Brush
1 Plastic Sheet
Elastics
Thread
Tie-Dye Paint
Acrylic Paint (White)
Instructions
- Flip the shirt to its back and fold it in half. Use the ruler measure out a 20 cm x 10cm rectangle over the bust area and trace over it with the sharpie.
- Draw a half heart inside the rectangle and cut it out.
- Cut out a 20cm x 20cm square from the white t-shirt, place the square fabric over the plastic sheet, pinch up a small section of the fabric into a roll and tie elastic over it, make 4-5 of these rolls.
- Pour the violet dye around the rolls but leave some blank spaces in between. Next, pour the navy blue dye over the blank spaces to fill it in, finish off by pouring pink dye over the top of the rolls. Without removing the elastic, rinse the dyed fabric in water and wring it dry.
- Remove elastic from the fabric and spread it out to reveal the galaxy print. Dip the brush in white paint and paint stars on the fabric.
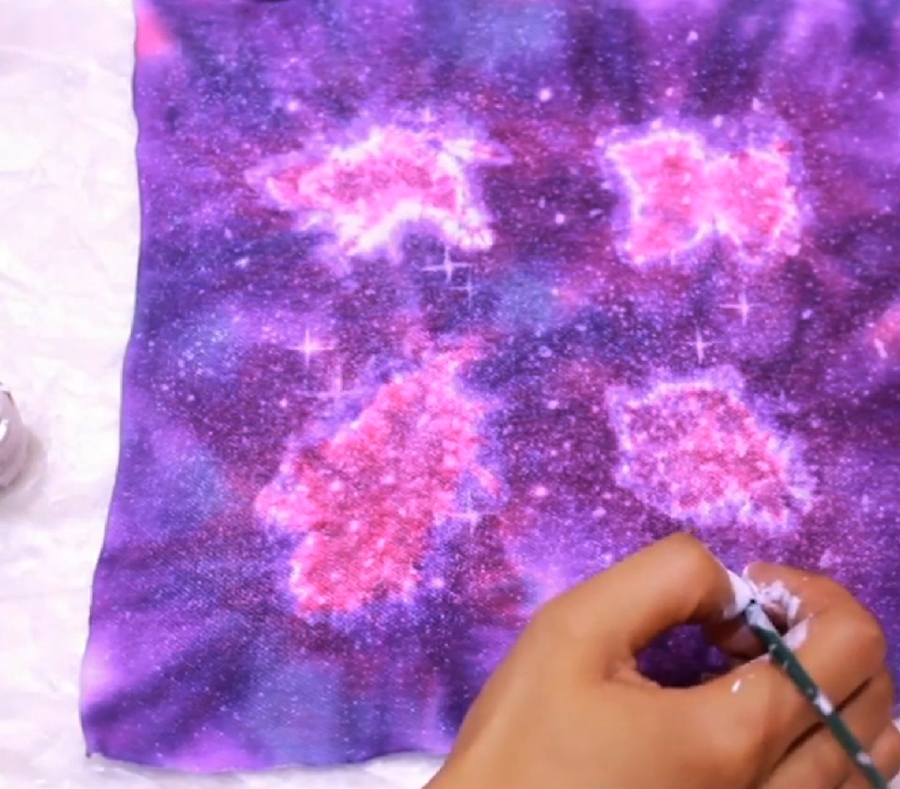
Dip the brush in white paint and paint stars on the fabric - Allow the fabric to dry for 1-2 hours, place it inside the shirt’s heart-shaped cutout area, thread the needle and sew it running stitch style onto the shirt.
Trendy Fringe Crop-Top
Materials
T-Shirt
1 Scissor
1 Sharpie
1 Cooking Pot
Powder Violet Tie-Dye
Instructions
- Cut out the shirt’s sleeves and neck areas. (Mark those areas with sharpie beforehand for cleaner cuts)
- Use the sharpie to draw a horizontal line across the shirt 4 inches up from the bottom, cut out fringes below the line and pull the fringes to elongate it.
- Heat up 2 glasses of water in a pot, add in 1 teaspoon of dye and stir to dissolve.
- Hold the shirt above the pot, dip the fringes into the dye, use a spoon to pour the dye evenly onto the area below the marked line. Allow the shirt to dry for 4-5 hours.
You will notice a huge difference after giving your t-shirts a DIY transformation, look effortlessly stylish since these shirts go well with various types of clothing, wear them with jeans, ruffled shorts, skirts and rock every look!
Video Tutorial
Follow our video tutorial above and check out our end results!
Tried making it at home? Share your results with us on Facebook, or Instagram.
Thanks to All That Glitters for sharing her video with us, check out more on her channel.

")


